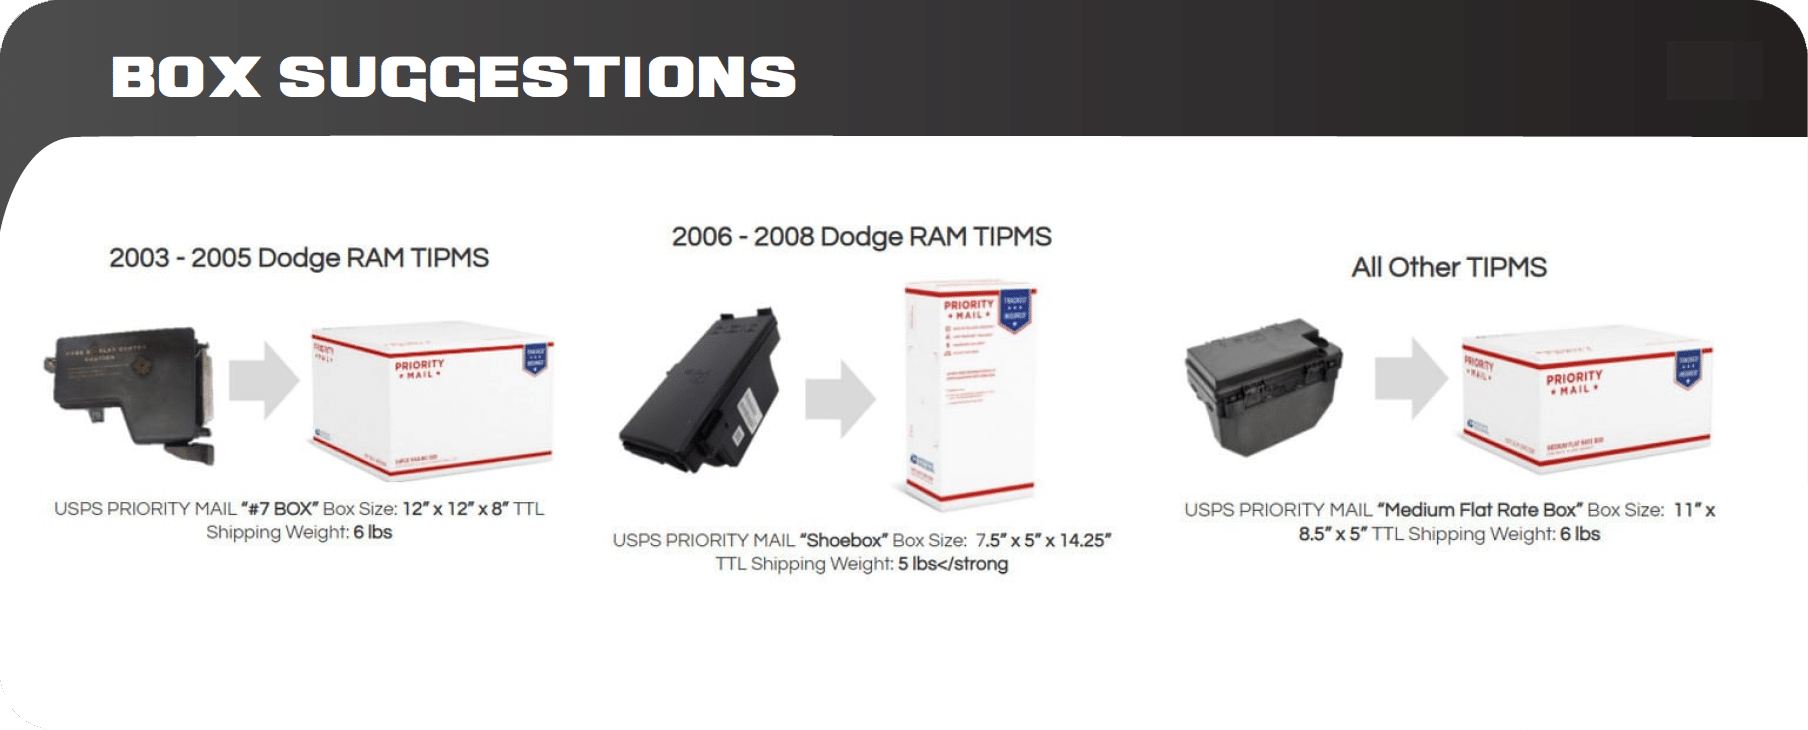
How to Test Your TIPM: A Step-by-Step Guide
How to Test Your TIPM: A Step-by-Step Guide
Issues with TIPMs (totally integrated power modules) can be incredibly frustrating, leading to unexpected vehicle problems, from power window failures to starting issues, and even dangerous situations like stalling or fuel pump malfunctions. Knowing how to test your TIPM can help you diagnose these problems accurately, potentially saving you time, money, and unnecessary repairs. In this guide, we’ll walk you through the essentials of testing your TIPM and understanding its vital role in your vehicle.
What is a TIPM?
The TIPM serves as the central hub of a vehicle’s electrical system in many Chrysler, Dodge, Jeep, and Ram models. It manages everything from fuel pumps and wipers to headlights and windows, as well as taillights, turn signals, starter, cooling fan, windshield wipers, washers, AC, radio, and the instrument cluster. The TIPM acts as the brain for all these functions, directing power where it’s needed while keeping systems separate to avoid overloads and shorts. When it malfunctions, it can cause problems that are hard to diagnose, as multiple systems can be affected simultaneously.
Common Signs of TIPM Failure
Before testing your TIPM, it’s crucial to recognize symptoms that could indicate TIPM issues:
- Random Electrical Malfunctions – Things like the headlights turning on or off by themselves, wipers and door locks activating without control, or the horn honking randomly.
- Starting Difficulties – Sometimes the vehicle will not start, or it will crank but not start or start intermittently.
- Vehicle Stalling – Stalling unexpectedly at high speeds and in traffic is less of an inconvenience and more of a safety issue.
- Fuel Pump – The fuel pump may not turn on or may run continuously, even after the vehicle is shut off. (If this is your issue, you may want to consider our patent-pending MAKS Fuel Pump Bypass.)
- Warning Lights – Various warning lights on the dashboard, such as the check engine light or ABS light, may illuminate.
- Drained Battery – Parasitic drain, meaning a TIPM can continuously draw power from the battery even when the vehicle is off.
If you notice any of these issues or similar electrical problems, you should test your TIPM to determine the root cause.
Tools Needed for TIPM Testing
Testing your TIPM requires a few tools, including:
- Multimeter – For checking voltages.
- OBD-II Scanner – For reading error codes.
- Basic Hand Tools – Such as a ratchet, 13, 12, and/or 10-millimeter socket, and a flathead screwdriver to access and remove the TIPM.
If you’re ready to proceed, remember to work carefully. Electrical components can be sensitive, and testing requires precision, patience, and safety.
How to Test your TIPM Steps
Step 1: Disconnect the Battery
Safety first! Start by disconnecting the vehicle’s battery. This will prevent accidental electrical surges and ensure that you’re not dealing with live circuits as you access the TIPM.
- Open your vehicle’s hood and locate the battery.
- Disconnect the negative terminal first, then the positive.
- With the battery disconnected, you’re now ready to begin testing the TIPM.
If you’d like a visual demonstration, see below a segment from our TIPM removal and installation video.
Step 2: Visually Inspect the TIPM
Before diving into multimeter tests, perform a visual inspection of the TIPM, including:
- Check for Burnt Smell or Burn Marks – Look for any signs of burning, corrosion, or exposed wiring.
- Inspect Connectors and Wires – Sometimes, wiring issues or loose connectors can cause TIPM-related problems. Make sure all wiring connections are secure and free from corrosion.
Step 3: Check for Error Codes with an OBD-II Scanner
An OBD-II scanner is a valuable tool for diagnosing TIPM issues because it will provide error codes that may directly indicate problems.
- Reconnect the battery temporarily.
- Plug the OBD-II scanner into the vehicle’s OBD port, typically found under the dashboard on the driver’s side.
- Follow the scanner’s instructions to retrieve diagnostic codes.
These codes can pinpoint specific issues, helping you target the exact problem areas. An OBD-II scanner can reveal several error codes related to TIPM (Totally Integrated Power Module) issues.
Here are some common codes related to a faulty TIPM:
- U0100: Lost Communication with ECM/PCM – This code indicates a communication problem between the TIPM and the engine control module.
- U0103: Lost Communication with the Gear Shift Control Module (GSCM) – This code signifies a problem with communication between the Gear Shift Control Module and the TIPM.
- U0155: Lost Communication with Instrument Panel Cluster (IPC) Control Module – This code points to a communication failure between the TIPM and the instrument panel cluster.
- U0184: Lost Communication with Radio – This code indicates a communication issue between the TIPM and the radio.
- P0884: Power Up at Speed – This code can be related to TIPM issues affecting the transmission control module.
- U110E: Lost Ambient Temperature Message – This code indicates that there’s a problem with communication between the TIPM and the ambient temperature sensor.
- B2100: Door Ajar Switch Circuit Failure – A faulty TIPM can cause issues with the door-ajar circuit.
- B210D: Battery Voltage Low – One of the signs of a failing TIPM is battery drain due to “stuck” relays or continuous power to systems that should shut off when the vehicle is off.
- B2112: Window Motor Circuit Failure – A malfunctioning TIPM might cause intermittent power to the window motor.
These codes can help diagnose specific problems with the TIPM and guide necessary repairs. If you encounter any of these codes, it’s advisable to consult with a qualified mechanic for a thorough inspection and accurate diagnosis.
Step 4: Test the TIPM Relays and Fuses with a Multimeter
Relays and fuses within the TIPM play a critical role in managing power distribution. A faulty relay or blown fuse could lead to issues that seem TIPM-related but are actually simpler to fix.
- Remove the TIPM cover to access the fuses and relays.
- Identify the relays related to your problem components (refer to the manual or this TIPM Fuse Layout).
- Set your multimeter to continuity mode and test each fuse and relay by placing the multimeter’s probes on the terminals.
A working relay or fuse will show continuity; a faulty one will not. Replace any faulty fuses or relays as necessary and test the affected systems again.
Step 5: Check Voltage Outputs
Your multimeter can also help test if the TIPM is delivering power correctly to various components.
- With the vehicle key turned to the “ON” position (engine off), reconnect the battery.
- Connect your multimeter to the TIPM’s output connections, referencing the TIPM wiring diagram.
- Check for correct voltage readings (typically 12V for most components).
If any connections show no or low voltage, this could indicate a TIPM issue, particularly if the corresponding component is non-functional.
Step 6: Perform a TIPM Reset
Sometimes, TIPM issues are software-related rather than hardware malfunctions. A reset can sometimes resolve minor issues.
Here are the steps for performing a soft reset, and you’ll see a video demonstration below.
- Disconnect and reconnect your battery.
- Turn the key to the run/start position, just short of cranking.
- Wait at least 120 seconds.
- The check engine and other lights on the cluster may flash.
- Turn off the vehicle.
- Turn the vehicle back on.
- You may have to repeat this several times.
If the soft reset continually fails, you should perform a hard reset. Here is a video tutorial on How to Perform a Hard Reset.
- Disconnect the battery.
- Remove the TIPM.
- Leave it disconnected overnight or at least 3 hours, allowing the system to reset.
- Reconnect the TIPM.
- Reconnect the battery and check if the problem persists.
If a reset resolves the problem, it may have been a software glitch but keep monitoring for any recurring issues.
When to Contact a TIPM Specialist
If you’ve followed these steps and are still experiencing issues, it may be time to consult an expert or replace your TIPM. Malfunctions can be challenging to diagnose and repair because of their integration with multiple systems.
Here at MAKS TIPM Rebuilders, we can provide professional TIPM repairs, rebuilds, or new replacements, ensuring your vehicle’s electrical systems are reliable and safe. Our customer service team is on-hand to help guide you through the process.
To find a replacement TIPM for your vehicle, visit our Shop TIPMs and Repairs page.